Process monitoring: new bidirectional sensor » bd-1 « measures shape and roughness of shafts inline
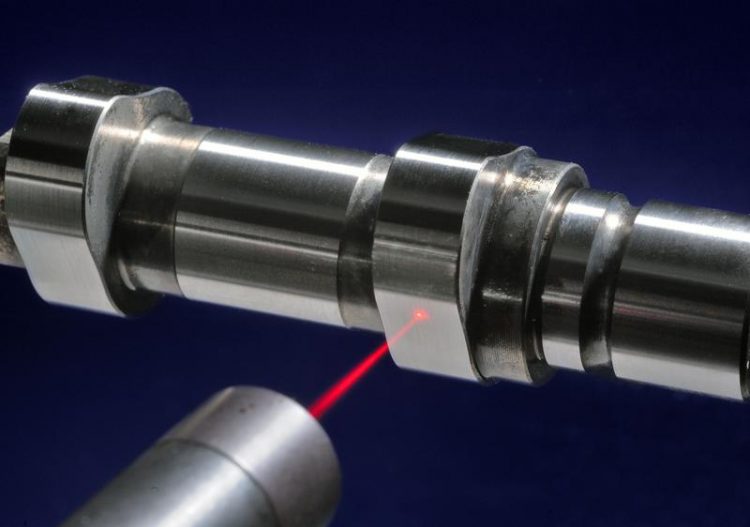
The » bd-1 « sensor carrying out a shape and roughness measurement on a camshaft. Source: Fraunhofer ILT, Aachen, Germany
Crankshafts, driveshafts, and camshafts are found in all internal combustion engines. The automotive industry sets extremely high standards on the manufacturing accuracy and surface characteristics of these shafts.
For example, camshafts must work with microsecond precision in controlling valve opening times synchronous to piston movement. Even the tiniest manufacturing errors can greatly impair engine performance, fuel consumption, and the service life of components.
Deviations from the specified roundness or roughness values, for instance, can lead to increased wear, unwanted noises, and malfunctions. Not surprisingly, then, the 100% inspection of shafts on the assembly line calls for measurement technology that is ten times more accurate than values applying to manufacturing technology. Measuring deviations in shape and position requires measurement accuracy in the micrometer range, sometimes even in the range of a few hundred nanometers.
For the most part, shaft measuring machines still use tactile distance sensors and laser triangulation sensors that measure a variety of characteristics such as cam shape, cam lift, base circle radius, roundness, eccentricity, angular position, and straightness of bearing positions. Surface roughness is usually measured separately using perthometers.
» bd-1 « pushes back the limits of measurement technology
Now experts at Fraunhofer ILT have developed the bidirectional optical sensor » bd-1 «, which can measure both the shape and roughness of shafts inline and needs only a fraction of the installation space that triangulation sensors take up. Its name alludes to the fact that the laser beam moves back and forth along a »bidirectional« single path. This does away with adjustment problems, as the transmitter and receiver no longer have to be aligned with each other. In direct comparison with conventional triangulation sensors, » bd-1 « boasts a much lower linearity error value, putting it way ahead of the field.
» bd-1 « can measure all kinds of surfaces – including finely polished, shining, and reflective surfaces, which can be difficult to measure with other optical sensors. It not only measures surfaces positioned at steep angles and drill holes with high aspect ratios; it also records surface roughness while measuring deviations in shape on rotating shafts – eliminating the need for a separate process step and equipment specifically for this purpose.
Precise, rapid inline measurement for quality inspection and process monitoring
» bd-1 « recognizes deviations in shape and the microscopic surface structure of shafts at speeds of several thousand revolutions per minute with an accuracy in the 100-nm range. This is made possible by high-speed data acquisition and processing and distance measurement frequencies of up to 70 kHz in some cases. » bd-1 « thus achieves the precision of interferometric sensors and is faster than conventional absolute-measurement distance sensors. » bd-1 « can be used both for quality inspection on the assembly line and for process monitoring during manufacture.
The sensor also works reliably in rough environments. The window for the beam outlet and inlet has a diameter of < 5 mm and can therefore be effectively protected against dirt by means of an air current.
Flexible applications
Fraunhofer ILT developers created the distance sensor primarily for manufacturers of shafts or of high-precision cylinder coordinate measuring machines (CCMMs) for components such as camshafts and crankshafts. » bd-1 « is ideally suited to the 100-percent inline inspection of geometric features in accordance with the requirements of the automotive industry. In field tests, » bd-1 « has already proved how effectively it can measure the thickness of rolled strips and blown films inline, or carry out roundness and distance measurements during the manufacture of turned parts in machine tools.
Visitors to the Control international trade fair for quality assurance in Stuttgart, which is taking place from May 6 to 9, 2014, will have the opportunity to see » bd-1 « in action as it performs live measurements at the joint Fraunhofer booth 1/1502.
Contact
Dipl.-Phys. Christian Tulea
Clinical Dioagnostics and Microsurgical Systems Group
Phone +49 241 8906-431
christian.tulea@ilt.fraunhofer.de
PD Dr. Reinhard Noll
Head of the Competence Area Measurement Technology and EUV Sources
Phone +49 241 8906-138
reinhard.noll@ilt.fraunhofer.de
Fraunhofer Institute for Laser Technology ILT
Steinbachstraße 15
52074 Aachen, Germany
Weitere Informationen:
Media Contact
All latest news from the category: Trade Fair News
Newest articles
Trotting robots reveal emergence of animal gait transitions
A four-legged robot trained with machine learning by EPFL researchers has learned to avoid falls by spontaneously switching between walking, trotting, and pronking – a milestone for roboticists as well…
Innovation promises to prevent power pole-top fires
Engineers in Australia have found a new way to make power-pole insulators resistant to fire and electrical sparking, promising to prevent dangerous pole-top fires and reduce blackouts. Pole-top fires pose…
Possible alternative to antibiotics produced by bacteria
Antibacterial substance from staphylococci discovered with new mechanism of action against natural competitors. Many bacteria produce substances to gain an advantage over competitors in their highly competitive natural environment. Researchers…


