CeBIT: TopDocuMation – a test system for painted components of all sizes
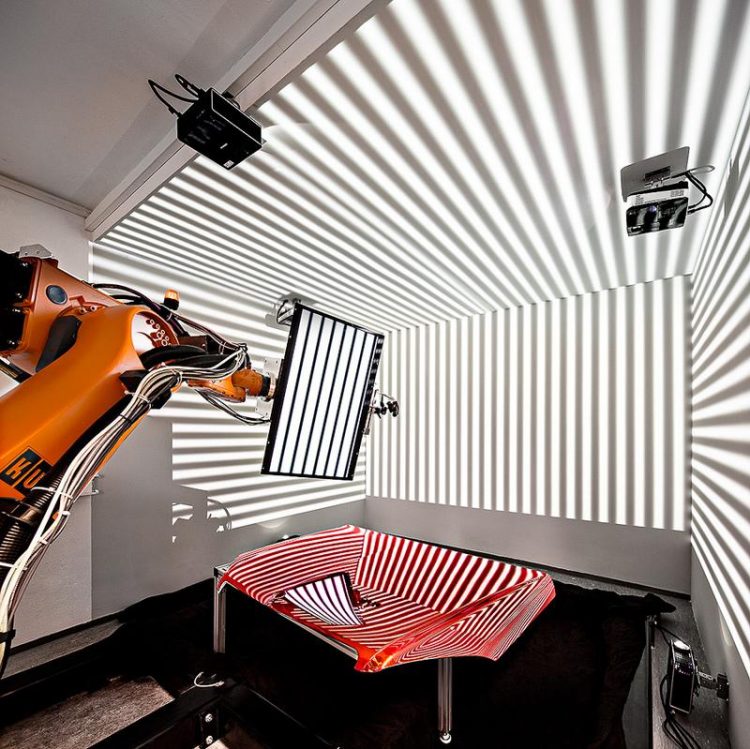
The deflectometric measurement method also allows for the inspection of large components with reflective surfaces. Photo: Manfred Zentsch © Fraunhofer IOSB
At CeBIT the Fraunhofer IOSB will present a test method that is also ideally suited for reflective surfaces and which simplifies the tester’s work with an integrated intuitive gesture control system.
The advantage of the deflectometric procedure over other 3D methods, such as triangulation and “shape from shading”, lies in that it examines not the surface itself but its mirror image. A graphic pattern consisting of either black-and-white stripes or a chess-board pattern is displayed on a screen. One or more cameras record images of the pattern’s reflection on the component’s surface. This can be compared with a human examiner, who views a reflecting object from various angles to detect surface defects.The object’s surface topography is then determined by a “measuring point cloud” that can be used to generate an FEM (finite element method) model of the surface. The generated FEM model of the actual surface can be compared with the contour of the CAD design drawing. The structure of the surface is clearly visible in the result. To assess the surface, statements about the surface structure on a micro level can be made (short-wave nature, paint quality). The sensitivity of the assessment can therefore be adapted to nearly all requirements.
Another special feature of the presented system is its integrated gesture control functionality. When the examiner points at the location at which a defect has been identified the system detects the exact position of the indicated point using 3D-tracking with two Kinects and records this position in the documentation system. Especially when dealing with very large components this simplifies the work processes and saves a lot of time, since examiners no longer have to leave their workplace to enter the type and location of the defect at a computer terminal.
To document various types of defect, the system can be trained to recognize hand gestures. If the part is conforming, the examiner, for example, wipes over it from left to right, releasing it for further processing.
The scientists will present the system at CeBIT at the Fraunhofer stand in Hall 9.
For further information about deflectometry visit:
http://www.iosb.fraunhofer.de/servlet/is/4698/?highlight=deflektometrie
For further information about gesture control visit:
http://www.iosb.fraunhofer.de/servlet/is/33978/?highlight=gesten
Media Contact
All latest news from the category: Trade Fair News
Newest articles
Trotting robots reveal emergence of animal gait transitions
A four-legged robot trained with machine learning by EPFL researchers has learned to avoid falls by spontaneously switching between walking, trotting, and pronking – a milestone for roboticists as well…
Innovation promises to prevent power pole-top fires
Engineers in Australia have found a new way to make power-pole insulators resistant to fire and electrical sparking, promising to prevent dangerous pole-top fires and reduce blackouts. Pole-top fires pose…
Possible alternative to antibiotics produced by bacteria
Antibacterial substance from staphylococci discovered with new mechanism of action against natural competitors. Many bacteria produce substances to gain an advantage over competitors in their highly competitive natural environment. Researchers…


